Friday, September 21, 2012

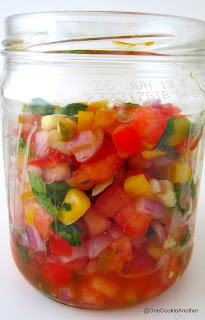
10-Minute Homemade Salsa

If you suffer from a chips-and-salsa syndrome like us, you will love this recipe. If you don't suffer from it, this will get you addicted. This is so easy and flavorful, that you won't be willing to buy salsa from the store again. And can be made in less than 10 minutes! Did I mention it's super easy? If you can chop, you can make this salsa. Let's get started...
 This recipe serves 2 very hungry people.

Ingredients
Roma Tomatoes: 3
Onion: about a tablespoon, chopped
Garlic: 1 small clove
Jalapeno Peppers (Canned or fresh): a tablespoon, chopped
Bell Pepper: 2 tablespoons, chopped (less than a quarter of a bell pepper)
Corn (I used frozen): 1 tablespoon
Cilantro: 1/4 cup, chopped
Lime Juice: about half a tablespoon (or of half a lime)
Salt: 1 teaspoon (or to taste)
Sugar: 1 teaspoon (or to taste)

Procedure
1) Finely chop the tomatoes, onions, bell pepper, cilantro, and Jalapeno pepper. It is VERY important to chop finely and evenly. Remember, biting on a huge chunk of onion is the last thing you want to do while watching a romantic movie.
2) Mince the garlic, in as small pieces as you can. Show him who the boss is.
3) In a bowl, combine the tomatoes, onions, bell pepper, corn, cilantro, jalapeno and garlic. You can optionally add pineapple or mango for a fun twist.
4) Add salt, sugar, lime juice, and mix well.
5) I would recommend leaving the salsa in the fridge for 4-6 hours to let the flavors mingle, but if you can't wait, dig right in!
 
Note: Go easy on the onion and garlic if you're not a big fan, but I personally think garlic takes this salsa to a whole new level.

I bottled up my salsa in a recycled (salsa!) glass jar. Shh, don't tell anyone it's made at home!

Friday, September 14, 2012

My Favorite Food Ever: Idli Sambar

Is there any such food that you love so much that it makes you feel alive and leaves a smile of satisfaction on your face? I don't mean to sounds crazy but Idli-Sambhar does have that effect on me. It makes me feel better about everything (Pittsburgh and Winter included). My husband always says that I should have been born in south India for my love of all kinds of idlis and dosas. I could eat them all day. And night. But, since you are not here to read about my obsessions, we'll move on to the recipe.

Now this may not be the authentic recipe since I, unfortunately, do not actually come from the South and this recipe is a mixture of my mom's recipe+some blogs+my own touch. But it sure is yummy enough to remind you of Udipi hotels back in India. Let's get ya droolin', shall we?

The recipe serves 4 regular people, or one if it's me.

Ingredients
For the idli batter
Rice (I used basmati, but you can also use Sona Masoori or any other non-sticky rice) : 1 cup
Urad Dal : 1/3 cup and 1 tablespoon
Methi (Fenugreek) Seeds: 4-5
Salt - about 2-3 teaspoons

For Sambhar
Toor Dal : 1 cup
Oil : 2 tablespoons
Hing : 1/2 teaspoon
Green Chillies : 2, finely chopped
Garlic : 2 cloves, finely chopped
Onion : 1 small, finely chopped
Curry Leaves : 4-5
Cumin Seeds : 1/2 teaspoon
Mustard Seeds : 1/2 teaspoon
Tomato : 1
Tamarind paste : 1 tablespoon
Salt : 2 teaspoons, or as needed
Sugar: 1 teaspoon
Turmeric Powder: 1 teaspoon
Red Chilly Powder: 1-2 teaspoons, according to taste
Carrot : about half a cup, chopped
Frozen Peas : about 1/4 cup
Sambhar Masala/Powder (I use Eastern Sambhar masala, but Everest and MTR are good too): 1 tablespoon

Procedure
For the Idlis
1) You need to plan ahead for this one. If you want to serve tomorrow evening, plan to start with the prep today evening. Wash and soak the rice, urad dal, and methi seeds with about 4 cups of water overnight.
2) Next morning, discard the water and grind the soaked mixture to a paste adding little water as required. Too much water will hinder the fermentation process, so only add as little as needed. It might be helpful to grind in batches if your blender does not have supernatural grinding powers (my humble Oster doesn't).
3) Add salt and mix well. Leave the batter to ferment in a warm spot for 10-12 hours. I usually preheat my oven to 240F (or the lowest temperature) and leave it for about 3-4 minutes before placing the batter in the oven. I've also found steel utensils to work much better for fermentation than plastic or glass for their ability to retain heat longer. If you are lucky enough to live in a warm place, you can leave the batter out in the sun.
4) You know the fermentation gods are happy when your batter rises to twice its original volume. Those little air bubbles will make your idlis spongy and soft.
5) Now start heating about 1.5 cups of water in a pressure cooker, without the lid on. Remove the small lid/weight from the whistle to let the steam escape as the idlis are cooking.
6) Grease your idli stand and pour the batter into the cavities. I have a "mini" idli stand so I can only scoop about a tablespoon batter in each.
7) Make sure that you arrange the cavities over the small hole provided for steaming in the idli stand. That way, the water from the above cavity does not directly fall on the idli below. Explaining that was complicated and I'm still not sure if that makes sense. Please let me know if it doesn't. I'm not even sure if it's called a "cavity", but I think you know what I mean. Here's a picture:
8)  By this time, the water in the pressure cooker should be steaming. Place the idli stand in the water and make sure that the bottom layer does not get submerged or even touch the water. Letting idlis go waste is an offence in my part of the town.
9) Let the idlis cook on medium-high for about 15-17 minutes. Then remove from flame and let it rest for 5-6 more minutes.
10) Use a knife or a spoon to run around the edges and dislodge the idlis.
11) Continue the process for remaining batter. Before doing that, eat one to make sure its cooked through and salted enough. Just to be sure, eat another one. And another. Maybe just one more, but that's it.
OK, one last if no one's watching.

Making the Sambhar
1) In a pressure cooker or another pan, cook toor daal until it is cooked through and mashable.
2) In another pan or kadhai, heat oil and add mustard and cumin seeds. When they splutter, add hing, onion, curry leaves, garlic, and chillies. Cook until onions are pink and translucent.
3) Add tomatoes and cook them for 2 minutes, until they are all mashed up.
4) Add turmeric powder and red chilly powder and saute for a minute.
5) Add the mashed toor daal and mix well to combine.
6) When the bubbles start appearing around the edges, add salt, sambhar powder, and sugar. Mix well.
7)  Add tamarind paste and stir to make sure no lumps remain.
8) Add water if the sambhar appears too thick. Do a taste-test and adjust accordingly.
9) Garnish with cilantro and serve!


Don't the idlis above look like a bunch of people chilling in the pool? :) 

Friday, August 31, 2012

Healthy and Yum Vegetable Corn Chowder

Corn chowder is great to have as a soup on the side, or with rustic bread as a wholesome meal. I don't usually cook with meat so I kept this version mostly vegetarian (I did add chicken broth, but you can easily substitute for vegetable broth). Corn chowder has a ton of veggies in it so its very nutritious and great for you.
I love it when healthy does not directly translate to cardboard eating.
Ingredients
Frozen (or fresh, boiled) corn - 1 and 1/4 cup
Olive Oil - 1 tablespoon
Onions - 1 small, chopped
Garlic - 2 cloves, finely chopped
Thyme - 1/2 teaspoon
Rosemary - 1/2 teaspoon
Boiled Potatoes - 2 small, chopped into bite sized chunks
Celery - 1 stalk, chopped
Carrots - 1, peeled and chopped
Red Bell Pepper - 1/2, chopped
Zucchini  - 1/2 cup when chopped
Milk - 1/2 cup
Chicken (or vegetable) broth - 1/2 cup
All Purpose Flour - 2 tablespoons
Salt - 1 teaspoon, or to taste
Pepper - 1/2 teaspoon, or to taste

Procedure
1) Chop all the veggies and set them aside. Pulse 1 cup corn in a blender with 1/2 cup water until they are a chunky paste.
2) Heat olive oil in a pan or soup pot and add garlic and onions. Saute till onions are translucent.
3) Add thyme and rosemary and saute for a minute.
4) Add the veggies : carrots, celery, bell pepper, potatoes, zucchini. Throw in some salt and pepper and saute for 3-4 minutes on medium flame.
5) Add the corn puree and stir.
6) Add the chicken broth and let it simmer for 4-5 minutes on a medium-low flame.
7) In a cup, stir together milk and all purpose flour until no lumps remain.
8) Add the milk to the pot and stir.
9) Let it simmer for a few minutes and then do a taste-test to check if you need to add salt or pepper. You can also choose to add some water if soup appears too thick, but chowder tastes best when its slightly on the thicker side.
10) Add the remaining 1/4 cup corn and serve warm!
This soup is reminiscent of the Veg. Sweet Corn soup that is popular in India.

Sunday, August 26, 2012

Kairi Panha (Aam Panna)

It's truly amazing how each season comes along with their own set of recipes. In winter, we make use of nuts and seasonal vegetables that provide warmth. In summer, we make use of veggies and fruits to make cool and refreshing dishes to keep the heat out. There are such recipes that have been passed down from generations with hardly any changes. For me, aam panna or kairi panha as we call it in Marathi, is one such dish. I remember visiting my grandparents during summer as a child, and playing with cousins incessantly in the sweltering heat. When we came back for dinner, there was always a delicious, cool and refreshing drink waiting for us. This drink is made of raw mangoes, something that's only available around summer. It's got good amount of Vitamin C and its believed to be great for the digestive system too. Plan to prepare this a little ahead so that you can let it cool down for at least a couple hours.

This recipe serves 4.


Ingredients
Raw Mangoes (Kairi) - 2 large, or 3 medium
Salt - 1/2 teaspoon
Granulated Sugar - 1/2 cup
Cardamom Powder - 1/2 teaspoon

Procedure
1) In a pressure cooker, add 4 cups water and raw mangoes. Cook for three whistles, then reduce the flame to the lowest and let it cook for 10 more minutes.
2) Once the steam has escaped from the cooker, remove the raw mangoes (carefully!) and let them cool on a dish.
3) Peel the mangoes and remove the pulp from the seeds. Discard the seeds.
4) In a blender, blend together the mango pulp, salt, sugar, and cardamom. Start with 1/4 cup sugar and increase gradually. The amount of sugar needed will depend on the sourness of the raw mangoes and your sweet tooth :).
5) The drink will sweeten slightly when cooled so don't add too much sugar if it doesn't seem sweet enough.
6) If your blender does a super job, you don't need to sieve the drink. I prefer to sieve it because that's what my mom used to do :).
7) At this point, you can either add water and refrigerate the drink, or you can use the mixture as a concentrate and add water and ice when required. Because I'm lazy, I added the water once so I wouldn't have to do it later. You can add about 1.5-2 cups of water to dilute the drink.
8) Pour in a bottle and refrigerate for a couple hours till the drink has cooled enough.

Serve!


Monday, August 20, 2012

Spiced Caramel Apple Cake

I don't want to spend much time writing a post on this recipe and keep you away from the utter goodness of this cake. Just follow the three steps first:

Step 1: See picture below.
Step 2: Drool.
Step 3: Make the cake already! Its very easy to prepare and your house will smell divine when it's baking. I wish it was possible to bottle up the aroma to fight dreary days. But, that's another story.

This recipe will serve 4.

Ingredients
For caramel sauce:
Butter, at room temperature - 1/4 cup
Brown Sugar - 1/2 cup

For the cake:
Granny Smith or Golden Delicious Apples - 2 
Butter, at room temperature - 1/4 cup
All Purpose Flour - 1 and 1/3 cups
Baking Powder - 1 teaspoon
Salt - 1/4 teaspoon
Pure Vanilla Extract - 1 teaspoon
Lemon Extract - 1/2 teaspoon
Granulated Sugar - 1 cup
Nutmeg - 1/2 teaspoon
Cinnamon - 1 teaspoon
Eggs, at room temperature - 2 small, or one large
Milk - 1/2 cup

Procedure
1) Start preheating the oven at 325 F.
2) Let's prepare the caramel sauce. In a microwave safe bowl, melt the butter until softened and just starting to melt.
3) Add brown sugar and mix until no lumps remain.
4) Place parchment paper at the bottom and around the edges of a regular cake pan (or if not using, grease the pan).
5) Spread the butter and sugar mixture evenly on the bottom of the pan.
6) Core the apples and slice them thinly. Place the apples in the cake pan over the sugar and butter mixture. Overlap them in layers, if required, to completely cover the base of the pan.
7) In a separate bowl, mix the dry ingredients : flour, baking powder, salt, nutmeg, cinnamon.
8) In a mixing bowl, add butter and sugar. Beat until creamy. Add vanilla and lemon extracts, and eggs and beat for a minute or two.
9) Add 1/3 of the dry ingredients mixture and mix gently with a spatula until no lumps remain. Do not overbeat!
10) Add half of the milk (1/4 cup) and mix until incorporated.
11) Add another 1/3rd of the dry ingredients mixture and mix. Add milk and mix again.
12) Add the remaining flour mixture and mix gently to combine.
13) Pour the batter over the apples in the cake pan and spread it out evenly.
14) Bake on the top rack of the oven for about 60 minutes (check once after 50 minutes to see if it's done. A toothpick inserted at the center of the cake should come out clean).
15) Remove the cake and place on cooling rack for 10 minutes. 
16) Place a plate on the cake pan and invert it to bring the apples and caramel layer on the top. Beautiful, isn't it?
17) This cake is best enjoyed warm and freshly baked, so add some whipped cream or vanilla ice cream and dig right in :)
As you see in the pictures, I added some sliced apples on the side for an additional crunch. This cake is not too sweet with just the right balance of the flavors coming from the caramel, cinnamon, and nutmeg. It will go equally well with a cup of coffee or with ice cream as a dessert! I'm sure there won't be any leftovers for this one, but if there are, the cake will freeze well too (i.e., for dreary days).

Monday, August 6, 2012

Baingan Bharta (Vangyache Bharit)

They say that the way to a man's heart is through his stomach. In our household, this certainly holds true. Luckily, my husband is non fussy and pretty easy to please when it comes to food. There are some dishes though, that win me more affection and quite a lot of appreciation! Baingan bharta, or vangyache bharit as we call it in Marathi, is of those dishes. The key to a good bharta is the smoky flavor that comes from roasting the eggplant directly on the flame or even better, on coal. For people who are not blessed with a gas stove, you may use the electric stove, oven, or steam the eggplant. Unfortunately, the flavor will suffer a little. If you are cooking for someone special, you may also be able to get their help with cleaning the stove, for these eggplants sure are messy!

Making a bharta starts with choosing the right kind of eggplant. The bigger the better? Absolutely not. The larger ones tend to have more seeds and are harder to cook. You want to go with the ones that are medium sized and a little soft to touch. These are the ones that will have the most juices and impart a beautiful flavor to the dish. These are, unfortunately, also the ones who will make you use your elbow grease for cleaning after cooking on the flame, as a lot of juice will also run out as you cook!

I add my mom-in-law's touch to this dish and use Spring Onions in the recipe. I think it works really well.


This recipe serves 4.

Ingredients
Eggplants (Medium sized) - 2
Olive Oil - 1 tablespoon and 3 tablespoons (divided)
Spring Onions - 4 bulbs with leaves
Hing/Asafoetida - a pinch
Mustard seeds - 1/2 teaspoon
Jeera (Cumin seeds) - 1/2 teaspoon
Tomato Puree - 3 tablespoons
Salt - 1.5 teaspoon or to taste
Green Chillies - 4 (or to taste)
Garlic - 3-4 cloves
Ginger - 1 small bulb (about a tablespoon when minced)
Dhania Jeera Powder - 1 teaspoon
Red Chilli powder - 2 teaspoons (or to taste)
Haldi powder (Turmeric) - 1 teaspooon

Procedure
1) Wash the eggplant and wipe them dry. Apply about half a tablespoon olive oil (or any oil that you use) evenly on the eggplants.
2) Place the eggplants directly on the flame (one of each stove) and let it roast evenly on all sides. You may want to roast about 5-7 minutes on each side until it is cooked through and the skin looks charred. Be very careful when dealing with the eggplants directly on the flame!
3) When the eggplants are roasted, place them on to a large plate and set them aside to let them cool down.
4) While the eggplants are cooling, chop the green onion.
5) Prepare a paste of ginger, garlic and chillies. Ever since I've discovered how easy it is to make this paste at home and how much of an difference it makes to the overall flavor of the dish, I have stopped using readymade pastes. I use a small Oster mixer attachment that my parents brought me from India that does an amazing job grinding and making pastes!
Throw the chillies, ginger, and garlic into the grinder..
and two seconds later..voila! It probably costs much lesser too.
6) Place the paste aside and peel the eggplants.
7) Mash 'em up with a potato masher or back of a spoon. Try not to lose any of the precious juice!
8) Heat 3 tablespoons oil in a pan and add jeera and mustard seeds. Let them crackle and then add a pinch of hing.
9) Add chopped spring onions and a pinch of salt. Let them cook till they are slightly wilted.
10) Add the chilly-ginger-garlic paste and cook until the raw smell disappears, a minute or two.
11) Add tomato puree and let it cook for another minute or two, until bubbles appear around the edges.
12) Add the spices - haldi (turmeric), red chilly powder, dhania jeera powder and give it a good mix.
13) Add the mashed eggplant mixture and salt and mix to combine.
14) Cook on a low flame for 10 minutes. If your eggplants were juicy enough you won't need any water. If they were dry then you can add a tablespoon or two.

I served my bharta with jowar bhakri, thecha (red chilly paste, not for the meek!), and sliced onions sprinkled with lemon juice. I also had salted buttermilk on the side to bring down the spiciness a little :)


Hope you enjoy the dish!

Thursday, July 12, 2012

"Frozen" Hot Chocolate

If you love chocolate and are craving for hot chocolate in summer, this drink is for you. If you don't love chocolate (or pretend not to), this recipe will make you fall in love.

It is super easy to prepare and everyone you serve it to will love you even more. I Promise.


This recipe serves two.

Ingredients
Milk - 2 cups
Hot cocoa mix packets (I used Nestle's) - 2
Semisweet Chocolate Chips - 2 tablespoons
Whipped cream on top (optional)
Chocolate sauce for garnish (optional)

Procedure
1) Boil milk in a saucepan on medium heat just until bubbles appear on the surface. Once they do, turn the heat off.
2) Pour the hot cocoa mix and stir with a whisk for 30 seconds.
3) Pour in the chocolate chips and whisk again until well incorporated.
4) Try not to drink all the hot chocolate. If you have a sweet-er tooth, add some more sugar at this step. Note that the hot cocoa mix already has some sugar.
5) Let the milk come down to room temperature.
6) After the milk has cooled, pour it in the serving glass.
7) Put the glass in the freezer for about 30 minutes.
8) After 30 minutes, remove from the freezer, add some whipped cream and garnish with chocolate shavings or chocolate sauce.

Note: The above recipe just cools the milk but does not set it. If you like a daiquiri type consistency, then you can pour the cocoa-milk mixture in ice tray, cover with plastic wrap, and let it cool a little longer. When set, throw them in the blender and serve chilled. To make life easier, you could also make a bulk of hot chocolate and store it in the ice trays covered with plastic wrap for up to one week.